Mr. Johnson (talk | contribs) No edit summary |
Mr. Johnson (talk | contribs) No edit summary |
||
| Line 2: | Line 2: | ||
The [[Weapon Workflow]] manages making Ranged Combat{{source|sr5|ref=173}} and Melee Combat{{source|sr5|ref=184}} Attack Tests, along with the associated Defense Tests{{source|sr5|ref=188}} and Damage Resistance Tests. | The [[Weapon Workflow]] manages making Ranged Combat{{source|sr5|ref=173}} and Melee Combat{{source|sr5|ref=184}} Attack Tests, along with the associated Defense Tests{{source|sr5|ref=188}} and Damage Resistance Tests. | ||
# Make sure that all the {{Category|Actor}}s involved are {{Item|Weapon}}s, {{Item|Ammo}}, and {{Item|Armor}} (if they plan to survive, anyway). | # Make sure that all the {{Category|Actor}}s involved are {{Item|Weapon}}s, {{Item|Ammo}}, and {{Item|Armor}} (if they plan to survive, anyway). | ||
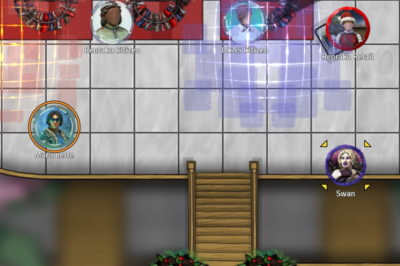
# Add {{foundry|Token|s}} for each of the Actors to a {{foundry|scene}}. | # Add {{foundry|Token|s}} for each of the Actors to a {{foundry|scene}}.{{Imagebox|fvtt-target-selected.png|A Selected<ref name="Border Control" /> Token (Left) and Targetted Token (Right)|f=11.315|s=0.17.1|float=right}} | ||
{{Imagebox|fvtt-target-selected.png|A Selected<ref name="Border Control" /> Token (Left) and Targetted Token (Right)|f=11.315|s=0.17.1|float=right}} | |||
# Identify the target token by hovering over it with the mouse pointer and pressing {{key|T}}. | # Identify the target token by hovering over it with the mouse pointer and pressing {{key|T}}. | ||
# Double-Click the attacking Token to open its Actor sheet; this will also Select<ref name="Border Control">Selected tokens will have a border matching the shape of the grid, or square on a gridless scene. The circular border shown is accomplished with a module, [https://foundryvtt.com/packages/Border-Control Border Control]</ref> the Token. | # Double-Click the attacking Token to open its Actor sheet; this will also Select<ref name="Border Control">Selected tokens will have a border matching the shape of the grid, or square on a gridless scene. The circular border shown is accomplished with a module, [https://foundryvtt.com/packages/Border-Control Border Control]</ref> the Token. | ||
Revision as of 21:33, 4 December 2023
Needs Improvement
This page is incomplete.
This article was last edited Monday, December 4, 2023 by Mr. Johnson.
The Weapon Workflow manages making Ranged Combat[sr 1] and Melee Combat[sr 2] Attack Tests, along with the associated Defense Tests[sr 3] and Damage Resistance Tests.
- Make sure that all the Actors involved are Weapons, Ammo, and Armor (if they plan to survive, anyway).
- Add Tokens for each of the Actors to a Scene.
A Selected[1] Token (Left) and Targetted Token (Right) (SR5 v0.17.1, FVTT v11.315)
- Identify the target token by hovering over it with the mouse pointer and pressing T.
- Double-Click the attacking Token to open its Actor sheet; this will also Select[1] the Token.
- Now click on the icon next to the weapon to start the test.
- The system will prompt you for your firing mode and then will roll your attack role. Distance, recoil and other mods from your weapon are automatically applied. A chat card will appear in the chat window showing you the result of the attack.
- The attacked player can now click on the 'Defense' button in the card to roll his defense roll. Firing modes, wounds etc. are automatically applied.
- Afterwards the attacked player can immediately roll his soak test. Armor piercing from the weapon / ammo automatically reduces his armor value. The result of the soak roll is posted to the chat.
- If you want to apply the damage, click on the damage value in the chat card and apply the damage to the character.
Speed Play Options
References
Sourcebook
- ↑ Shadowrun Fifth Edition Core Rulebook (p. 173)
- ↑ Shadowrun Fifth Edition Core Rulebook (p. 184)
- ↑ Shadowrun Fifth Edition Core Rulebook (p. 188)
- ↑ 1.0 1.1 Selected tokens will have a border matching the shape of the grid, or square on a gridless scene. The circular border shown is accomplished with a module, Border Control

