Mr. Johnson (talk | contribs) Tag: Reverted |
Mr. Johnson (talk | contribs) |
||
| (23 intermediate revisions by the same user not shown) | |||
| Line 1: | Line 1: | ||
[[Category:Content]][[Category:Workflow]][[Category:Mundane Workflow]]{{Imagebox|fvtt-target-selected.png|A Selected<ref name="Border Control" /> Token (Marionette, Left) and | [[Category:Content]][[Category:Workflow]][[Category:Mundane Workflow]]{{Imagebox|fvtt-target-selected.png|A Selected<ref name="Border Control" /> Token (Marionette, Left) and Targeted Token (Swan, Right)|f=11.315|s=0.17.1|float=right}} | ||
The [[Weapon Workflow]] manages making Ranged Combat{{source|sr5|ref=173}} and Melee Combat{{source|sr5|ref=184}} Attack Tests, along with the associated Defense Tests{{source|sr5|ref=188}} and Damage Resistance Tests. | The [[Weapon Workflow]] manages making Ranged Combat{{source|sr5|ref=173}} and Melee Combat{{source|sr5|ref=184}} Attack Tests, along with the associated Defense Tests{{source|sr5|ref=188}} and Damage Resistance Tests. | ||
==Ranged Weapon Attacks== | ==Ranged Weapon Attacks== | ||
Start by making sure that all the {{Category|Actor}}s involved are | Start by making sure that all the {{Category|Actor}}s involved are equipped with {{Item|Weapon}}s, {{Item|Ammo}}, and {{Item|Armor}} (if they plan to survive, anyway). | ||
* Add {{ | * Add {{Foundry|Token|s}} for each of the Actors to a {{Foundry|scene}}. | ||
* Identify the target token by hovering over it with the mouse pointer and pressing {{ | * Identify the target token by hovering over it with the mouse pointer and pressing {{Key|T}}. | ||
* Double-Click the attacking Token to open its Actor sheet; this will also Select<ref name="Border Control">Selected tokens will have a border matching the shape of the grid, or square on a gridless scene. The circular border shown is accomplished with a module, [https://foundryvtt.com/packages/Border-Control Border Control]</ref> the Token. | * Double-Click the attacking Token to open its Actor sheet; this will also Select<ref name="Border Control">Selected tokens will have a border matching the shape of the grid, or square on a gridless scene. The circular border shown is accomplished with a module, [https://foundryvtt.com/packages/Border-Control Border Control]</ref> the Token. | ||
* On the | * On the {{Tab|Actor|Gear}}, Left-Click the icon for the desired Weapon to bring up the {{Anchor|Ranged Weapon Attack}} dialog. | ||
===Attack Test=== | ===Attack Test=== | ||
The '''Ranged Weapon Attack''' dialog provides the details about the impending attack and provides options to configure it. | The '''Ranged Weapon Attack''' dialog provides the details about the impending attack and provides options to configure it. | ||
<div style="display: flex; flex-wrap: wrap; float:right; margin: 10px"> | <div style="display: flex; flex-wrap: wrap; float:right; margin: 10px"> | ||
<div style="margin: 0px -10px;">{{Imagebox|sr5-work-weapon-range-attack.webp|Ranged Weapon Attack | <div style="margin: 0px -10px;">{{Imagebox|sr5-work-weapon-range-attack-dialog.webp|Ranged Weapon Attack Dialog|f=12.331|s=0.21.2|float=none|clear=none|width=320px}}</div> | ||
<div style="margin: 0px -10px;">{{Imagebox|sr5-work-weapon-range-rollcard.webp|Ranged Weapon Attack | <div style="margin: 0px -10px;">{{Imagebox|sr5-work-weapon-range-rollcard.webp|Ranged Weapon Attack Roll Card|f=10.312|s=0.14.1|float=none|clear=none|width=320px}}</div> | ||
</div> | </div> | ||
* The top section shows the Selected actor and the Weapon being used. | * The top section shows the Selected actor and the Weapon being used. | ||
* {{Anchor|Ammunition}} displays the current and maximum number of bullets available in the weapon. | * {{Anchor|Ammunition}} displays the current and maximum number of bullets available in the weapon. | ||
* {{Anchor|Recoil Comp.}} shows the Weapon's total Recoil Compensation, including the Weapon's base value, any from attached {{Item|Mod}}s, and from the Actor's Strength. | * {{Anchor|Recoil Comp.}} shows the Weapon's total Recoil Compensation, including the Weapon's base value, any from attached {{Item|Mod}}s, and from the Actor's Strength. | ||
* {{Anchor|Recoil}} shows the character's current Progressive Recoil{{source|sr5|ref=175}}, how much will be added by the selected '''Fire Mode''', and provides a button to | * {{Anchor|Recoil}} shows the character's current Progressive Recoil{{source|sr5|ref=175}}, how much will be added by the selected '''Fire Mode''', and provides a button to {{Button|Reset}} it. | ||
* {{Anchor|Fire Mode}} provides a dropdown list of the available options configured on the Weapon. It will take '''Recoil''' into account to determine appropriate '''Modifiers'''. | * {{Anchor|Fire Mode}} provides a dropdown list of the available options configured on the Weapon. It will take '''Recoil''' into account to determine appropriate '''Modifiers'''. | ||
* {{Anchor|Selected Targets}} calculates range to all | * {{Anchor|Selected Targets}} calculates range to all Targeted tokens. The attack will only be processed against one selected Target, even if Suppresive Fire is selected under '''Fire Mode'''.{{Issue|1015}} | ||
{{Stub:Roll Dialog Bullets}} | |||
The results of the '''Attack Test''' appear in the {{Foundry|chat|Chat Log}}, including Attacker, Weapon, Die Pool Results and so on — all the [[Roll Card Basics]] are available. | |||
The results of the '''Attack Test''' appear in the {{Foundry|chat|Chat Log}}, including Attacker, Weapon, Die Pool Results and so on | |||
* Clicking on the Token image Selects the corresponding Token, making it easy to be sure the right one is Selected. (Clicking on the Target's name opens the Actor sheet, if needed.) | * Clicking on the Token image Selects the corresponding Token, making it easy to be sure the right one is Selected. (Clicking on the Target's name opens the Actor sheet, if needed.) | ||
* Clicking on '''Physical Defense''' brings up the {{Anchor|Physical Defense}} dialog. | * Clicking on '''Physical Defense''' brings up the {{Anchor|Physical Defense}} dialog. | ||
| Line 30: | Line 26: | ||
===Defense Test=== | ===Defense Test=== | ||
<div style="display: flex; flex-wrap: wrap; float:right; margin: 10px;"> | <div style="display: flex; flex-wrap: wrap; float:right; margin: 10px;"> | ||
<div style="margin: 0px -10px">{{Imagebox|sr5-work-weapon-defense.webp|Physical Defense Test|f=11.315|s=0.17.1|float=none|clear=none|width=320px}}</div> | <div style="margin: 0px -10px">{{Imagebox|sr5-work-weapon-defense-dialog.webp|Physical Defense Test|f=11.315|s=0.17.1|float=none|clear=none|width=320px}}</div> | ||
<div style="margin: 0px -10px">{{Imagebox|sr5-work-weapon-defense-rollcard.webp|Physical Defense | <div style="margin: 0px -10px">{{Imagebox|sr5-work-weapon-defense-rollcard.webp|Physical Defense Roll Card|f=10.312|s=0.14.1|float=none|clear=none|width=320px}}</div> | ||
</div> | </div> | ||
The '''Physical Defense''' dialog provides options to configure the character's attempt to avoid damage. | The '''Physical Defense''' dialog provides options to configure the character's attempt to avoid damage. | ||
* The first section controls if the character has {{Anchor|Cover}} or will be using an {{Anchor|Active Defense}}{{source|sr5|ref=190}} to improve their defense. Note that the options are generic across all Physical Defense Tests, so it will allow Active Defenses that are not appropriate against a Ranged Attack Test.{{Issue|1024}} | * The first section controls if the character has {{Anchor|Cover}} or will be using an {{Anchor|Active Defense}}{{source|sr5|ref=190}} to improve their defense. <!--Note that the options are generic across all Physical Defense Tests, so it will allow Active Defenses that are not appropriate against a Ranged Attack Test.{{Issue|1024}}--> | ||
* The rest of the dialog functions the same as the '''Ranged Weapon Attack''' dialog, summarizing the Test and giving the option to apply Edge. | * The rest of the dialog functions the same as the '''Ranged Weapon Attack''' dialog, summarizing the Test and giving the option to apply Edge. | ||
The results of the '''Physical Defense''' are summarized in the Chat Log. | The results of the '''Physical Defense''' are summarized in the Chat Log. | ||
* If the target used an Active Defense, there is a button to apply the appropriate '''Initiative''' modifer to the character. In the case of Full Defense, the system does not track it over the whole turn. You will need to selected it in subsequent Defense Tests but not apply the Initiative penalty more than once. | * If the target used an Active Defense, there is a button to apply the appropriate '''Initiative''' modifer to the character. In the case of Full Defense{{source|sr5|ref=168}}, the system does not track it over the whole turn. You will need to selected it in subsequent Defense Tests but not apply the Initiative penalty more than once. | ||
{{Clear|both}} | |||
===Damage Resistance Test=== | ===Damage Resistance Test=== | ||
<div style="width:365px; float:right;"> | <div style="width:365px; float:right;"> | ||
{{Imagebox|sr5-work-weapon-resist.webp|Damage Resistance Test|f=11.315|s=0.17.1|float=none|clear=none|width=320px}} | {{Imagebox|sr5-work-weapon-resist-dialog.webp|Damage Resistance Test|f=11.315|s=0.17.1|float=none|clear=none|width=320px}} | ||
{{Imagebox|sr5-work-weapon-resist-rollcard.webp|Damage Resistance | {{Imagebox|sr5-work-weapon-resist-rollcard.webp|Damage Resistance Roll Card|f=11.315|s=0.17.1|float=none|clear=none|width=320px}} | ||
</div> | </div> | ||
When the '''Defense Test''' fails, the Target will automatically be prompted with the {{Anchor|Physical Damage Resist}} dialog: | When the '''Defense Test''' fails, the Target will automatically be prompted with the {{Anchor|Physical Damage Resist}} dialog: | ||
| Line 51: | Line 48: | ||
* Clicking the '''Modified'''{{Issue|1028}} Damage Value will prompt to apply that damage to the indicated Actor. (Poor Swan.) | * Clicking the '''Modified'''{{Issue|1028}} Damage Value will prompt to apply that damage to the indicated Actor. (Poor Swan.) | ||
* It also displays wether the character suffers Knockdown{{source|sr5|ref=194}} from the attack. | * It also displays wether the character suffers Knockdown{{source|sr5|ref=194}} from the attack. | ||
{{Whitebox|Gel Rounds|width=Calc(100% - 370px)}} | |||
{{Imagebox|sr5-work-damage-apply.webp|Damage Application|f=11.315|s=0.17.1|float=left|clear=none}} | {{Imagebox|sr5-work-damage-apply.webp|Damage Application|f=11.315|s=0.17.1|float=left|clear=none}} | ||
{{Clear|left}} | |||
===Area of Effect Attacks=== | ===Area of Effect Attacks=== | ||
{{Imagebox|sr5-work-weapon-area- | {{Imagebox|sr5-work-weapon-area-rollcard.webp|Ranged Weapon Attack Test Roll Card with Area-of-Effect|f=11.315|s=0.17.1|float=right|width=320px}} | ||
When making an Attack with an an area-of-effect weapon, the '''Ranged Weapon Attack''' rollcard{{Issue|675}} will include a button for ''' {{#fas:bullseye}} Place Template'''. This will create a {{Foundry|Template}} of the configured radius. | When making an Attack with an an area-of-effect weapon, the '''Ranged Weapon Attack''' rollcard{{Issue|675}} will include a button for ''' {{#fas:bullseye}} Place Template'''. This will create a {{Foundry|Template}} of the configured radius. | ||
Using the '''Defense Test''' button assumes the target is being directly struck by the projectile and applies the appropriate modifier.{{source|sr5|ref=190}}{{Issue|742}} If the target is using some other form of defense, like Run For Your Life{{source|r&g|ref=125}}, you can skip to the '''Damage Resistance Test''' by giving them big enough '''Modifiers''' to reduce their pool to zero. Note that the '''Damage Value''' does not reflect fall-off; it will have to be calculated manually. | Using the '''Defense Test''' button assumes the target is being directly struck by the projectile and applies the appropriate modifier.{{source|sr5|ref=190}}{{Issue|742}} If the target is using some other form of defense, like Run For Your Life{{source|r&g|ref=125}}, you can skip to the '''Damage Resistance Test''' by giving them big enough '''Modifiers''' to reduce their pool to zero. Note that the '''Damage Value''' does not reflect fall-off; it will have to be calculated manually. | ||
{{Imagebox|fvtt-target-aoe.webp|Area-of-Effect Template Placement|f=11.315|s=0.17.1|float=none}} | {{Imagebox|fvtt-target-aoe.webp|Area-of-Effect Template Placement|f=11.315|s=0.17.1|float=none|clear=both}} | ||
==Melee Weapon Attacks== | ==Melee Weapon Attacks== | ||
{{Imagebox|sr5-work-weapon-melee-attack.webp|Melee Weapon Attack Test|f=11.315|s=0.17.1|float=right|width=320px}} | {{Imagebox|sr5-work-weapon-melee-attack-dialog.webp|Melee Weapon Attack Test|f=11.315|s=0.17.1|float=right|width=320px}} | ||
'''Melee Weapon Attacks''' work very much like '''Ranged Weapon Attacks'''. The biggest difference is that the {{Anchor|Melee Weapon Attack}} dialog only has one configurable parameter — '''Reach'''. The displayed value takes into account both the Weapon's Reach and the character's inherent Reach (from the | '''Melee Weapon Attacks''' work very much like '''Ranged Weapon Attacks'''. The biggest difference is that the {{Anchor|Melee Weapon Attack}} dialog only has one configurable parameter — '''Reach'''. The displayed value takes into account both the Weapon's Reach and the character's inherent Reach (from the {{Tab|Actor|Misc}}). | ||
Otherwise, the process proceeds exactly as it does for a '''Ranged Weapon Attack'''. | Otherwise, the process proceeds exactly as it does for a '''Ranged Weapon Attack'''. | ||
Latest revision as of 20:09, 7 October 2025
The Weapon Workflow manages making Ranged Combat[sr 1] and Melee Combat[sr 2] Attack Tests, along with the associated Defense Tests[sr 3] and Damage Resistance Tests.
Ranged Weapon Attacks
Start by making sure that all the Actors involved are equipped with Weapons, Ammo, and Armor (if they plan to survive, anyway).
- Add Tokens for each of the Actors to a Scene.
- Identify the target token by hovering over it with the mouse pointer and pressing T.
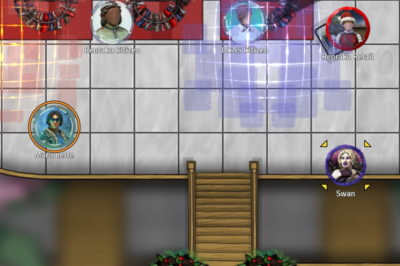
- Double-Click the attacking Token to open its Actor sheet; this will also Select[1] the Token.
- On the Actor's Gear Tab, Left-Click the icon for the desired Weapon to bring up the Ranged Weapon Attack dialog.
Attack Test
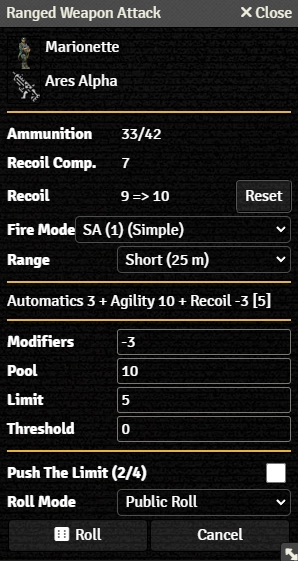
The Ranged Weapon Attack dialog provides the details about the impending attack and provides options to configure it.
- The top section shows the Selected actor and the Weapon being used.
- Ammunition displays the current and maximum number of bullets available in the weapon.
- Recoil Comp. shows the Weapon's total Recoil Compensation, including the Weapon's base value, any from attached Modifications, and from the Actor's Strength.
- Recoil shows the character's current Progressive Recoil[sr 4], how much will be added by the selected Fire Mode, and provides a button to Reset it.
- Fire Mode provides a dropdown list of the available options configured on the Weapon. It will take Recoil into account to determine appropriate Modifiers.
- Selected Targets calculates range to all Targeted tokens. The attack will only be processed against one selected Target, even if Suppresive Fire is selected under Fire Mode.[git 1]
- The next line shows a summary of the Skill, Attribute, and other modifiers included in the roll, plus the Limit.
- Modifiers, Pool, Limit, and Threshold show the calculated values for the Test. They can be maually modified.
- Push The Limit[sr 5] shows the Actor's current and maximum Edge, and provides a checkbox to apply it to the current attack.
- Roll Mode applies one of Foundry's Roll Modes whenever the action is used. It overrides whatever is selected in the Chat Messages sidebar.
- Pressing Roll executes the roll.
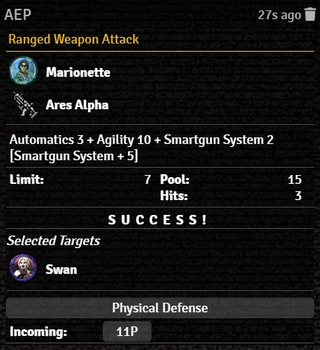
The results of the Attack Test appear in the Chat Log, including Attacker, Weapon, Die Pool Results and so on — all the Roll Card Basics are available.
- Clicking on the Token image Selects the corresponding Token, making it easy to be sure the right one is Selected. (Clicking on the Target's name opens the Actor sheet, if needed.)
- Clicking on Physical Defense brings up the Physical Defense dialog.
Defense Test
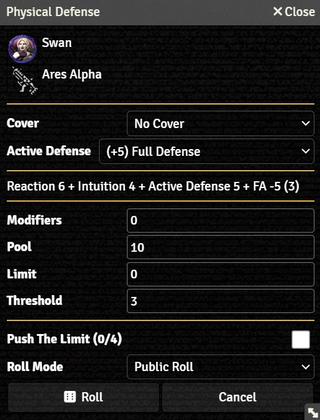
The Physical Defense dialog provides options to configure the character's attempt to avoid damage.
- The first section controls if the character has Cover or will be using an Active Defense[sr 6] to improve their defense.
- The rest of the dialog functions the same as the Ranged Weapon Attack dialog, summarizing the Test and giving the option to apply Edge.
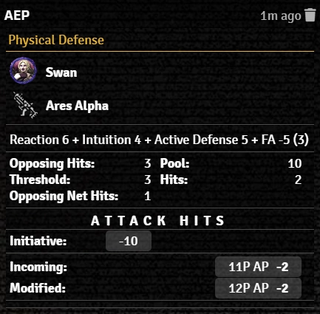
The results of the Physical Defense are summarized in the Chat Log.
- If the target used an Active Defense, there is a button to apply the appropriate Initiative modifer to the character. In the case of Full Defense[sr 7], the system does not track it over the whole turn. You will need to selected it in subsequent Defense Tests but not apply the Initiative penalty more than once.
Damage Resistance Test
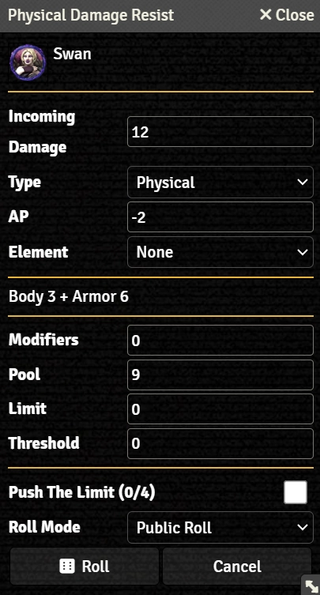
When the Defense Test fails, the Target will automatically be prompted with the Physical Damage Resist dialog:
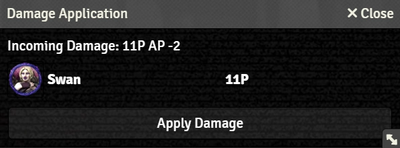
- The top section summarizes the incoming attack, including Incoming Damage adjusted for the Attacker's margin of success, along with the Type AP, and Element configured on the weapon.
- Middle section shows the Pool; Armor is pre-adjusted for the Attack's AP.
- The rest of the dialog functions the same as the Ranged Weapon Attack dialog, summarizing the Test and giving the option to apply Edge.
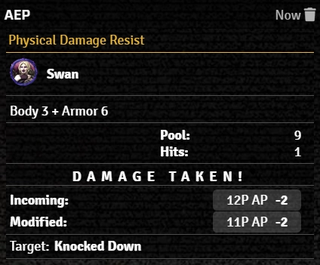
The restults of the Physical Damage Resist Test are summarized in the Chat Log.
- Clicking the Modified[git 2] Damage Value will prompt to apply that damage to the indicated Actor. (Poor Swan.)
- It also displays wether the character suffers Knockdown[sr 8] from the attack.
The Weapon Workflow will take into account the extra chance of Knockdown provided by Gel Rounds[sr 9], if the Weapon Item includes an appropriately-named embedded Ammunition Item or Gear Modification Item).The Item must be equipped within the Weapon's Ammo Tab or Modification Tab and named exactly as below — it is language-dependent, case-sensitive, and not tolerant of any variation (extra spaces will break detection, for instance).
- English:
Gel Rounds - German:
Gelmunition - French:
Cartouches gel - Korean:
젤 탄약 - Brazilian-Portuguese is not translated by the code, so must use the English string.
Area of Effect Attacks
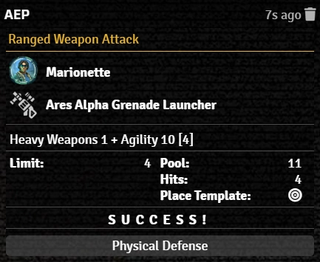
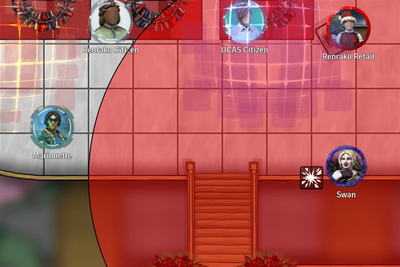
When making an Attack with an an area-of-effect weapon, the Ranged Weapon Attack rollcard[git 3] will include a button for Place Template. This will create a Template of the configured radius.
Using the Defense Test button assumes the target is being directly struck by the projectile and applies the appropriate modifier.[sr 6][git 4] If the target is using some other form of defense, like Run For Your Life[sr 10], you can skip to the Damage Resistance Test by giving them big enough Modifiers to reduce their pool to zero. Note that the Damage Value does not reflect fall-off; it will have to be calculated manually.
Melee Weapon Attacks
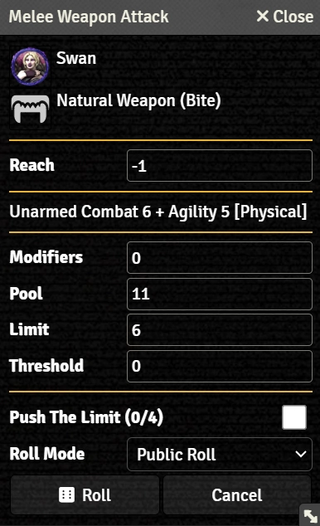
Melee Weapon Attacks work very much like Ranged Weapon Attacks. The biggest difference is that the Melee Weapon Attack dialog only has one configurable parameter — Reach. The displayed value takes into account both the Weapon's Reach and the character's inherent Reach (from the Actor's Misc Tab).
Otherwise, the process proceeds exactly as it does for a Ranged Weapon Attack.
Reloading
Ammo in an Actor's Gear Tab should be thought of as loose rounds or boxed ammo, not ready to be used in a particular weapon. Each Weapon has an internal inventory, the Weapon's Ammo Tab, reflecting what's loaded into clips ready for use with that specific weapon.
As of SR5 v0.20.0, switching Ammo types in a Weapon is somewhat of a manual process. In effect, you have to unload the weapon manually before switching ammo types and reloading.
- On the Weapon Item's Weapon Tab, zero out the ammo but remember how many rounds were left.
- On the Weapon Item's Ammo Tab, edit the Ammo Item and add the removed quantity back to the weapon's inventory.
- On the Weapon Item's Ammo Tab, select the new ammo type.
- On the Actor's Gear Tab, click
Reload (X/Y)on the weapon.
This will update the ammo quantity in the weapon and deduct it from the weapon's inventory.
Speed Play Options
Once comfortable with the basic process, there are options to make things slightly quicker.
- You can drag a Weapon from an Actor's Gear Tab to the Macro hotbar. It will automatically create a macro for weapon. Instead of double-clicking to open the Actor's sheet, you can then click to select the Token then click to make the attack. Note that if you have the wrong actor selected and they don't have a weapon with a matching name, it will throw an error.
- SHIFT+Click skips roll dialogs and makes the Test directly. This does mean there's no opportunity to make any ad hoc adjustments.
References
GitHub Issues
Sourcebook
- ↑ Shadowrun Fifth Edition Core Rulebook (p. 173)
- ↑ Shadowrun Fifth Edition Core Rulebook (p. 184)
- ↑ Shadowrun Fifth Edition Core Rulebook (p. 188)
- ↑ Shadowrun Fifth Edition Core Rulebook (p. 175)
- ↑ Shadowrun Fifth Edition Core Rulebook (p. 56)
- ↑ 6.0 6.1 Shadowrun Fifth Edition Core Rulebook (p. 190)
- ↑ Shadowrun Fifth Edition Core Rulebook (p. 168)
- ↑ Shadowrun Fifth Edition Core Rulebook (p. 194)
- ↑ Shadowrun Fifth Edition Core Rulebook (p. 434)
- ↑ Run & Gun (p. 125)
- ↑ 1.0 1.1 Selected tokens will have a border matching the shape of the grid, or square on a gridless scene. The circular border shown is accomplished with a module, Border Control
